
How to Add Payment Icons and Trust Badges in Wix Stores E-Commerce Sites?
- Editors at Codeyard

- 6 days ago
- 3 min read

When a shopper lands on your product page, they make a split-second decision about whether to trust your store.
Payment icons like Visa, Mastercard, PayPal and Stripe, along with trust badges like "Secure Checkout" or "Money-Back Guarantee," are the fastest way to remove that hesitation.
Research consistently shows that displaying recognizable payment logos near the "Add to Cart" or "Buy Now" button reduces cart abandonment and increases conversion rates. On Wix Stores, adding these icons is straightforward with the right app.
Step to Add Payment Icons and Trust Badges in Wix Stores E-Commerce Sites
Step 1: Install the App

Go to the Wix App Market and search for "Payment Icons and Trust Badges". Click Add to Site and follow the prompts to install it.

Step 2: Open the Dashboard
Once installed, open the app from your Wix dashboard sidebar. You'll land on the setup checklist, which walks you through each step in order.

Step 3: Choose Your Icons
Click Choose Icons to browse the icon library. You can select from popular payment methods (Visa, Mastercard, PayPal, Apple Pay, Google Pay, Stripe, and more) as well as trust badges (SSL Secure, Money-Back Guarantee, Free Shipping, etc.).
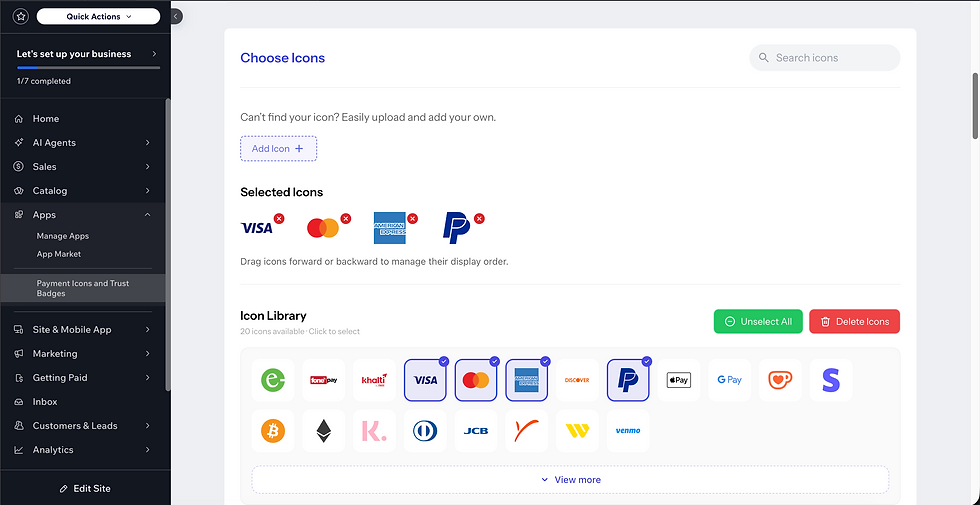
Select all the icons relevant to your store and save.
Step 4: Style Your Icons
Click Style Icons to customize how they look.

You can adjust:
Size: small, medium, or large
Color: original colors, monochrome, or grayscale
Layout: horizontal row or grid
Spacing: padding between icons
This lets you match the badges to your store's branding.
Step 5: Assign Placement
This is where you choose where on your site the icons will appear. The app supports three pages:

Product Page: Shows icons near the Add to Cart button, the highest-impact placement for trust signals.
Side Cart: Displays icons in the slide-out cart drawer, reassuring shoppers right before they proceed to checkout.
Checkout Page: Adds icons to the checkout page itself, the last point where hesitation can kill a sale.
For each page, select the slot (position) where you'd like the icons to appear, then click Add Plugin. You'll see a confirmation dialog. Note that once a slot is assigned it cannot be changed without removing the plugin first, so choose carefully.
Step 6: Enable the Plugin
Navigate to the Enable Plugin screen and toggle the plugin on. This activates the icons on your live site for visitors.

Step 7: Preview
Click Preview to open a live preview of your store with the icons in place. Confirm everything looks right before sharing with customers.

Tips for Best Results
Place icons below the Add to Cart button on your product page, this is where shoppers look before committing.
On the checkout page, keep icons subtle (grayscale or small size) so they don't distract from the checkout flow.
Use the Side Cart placement if your store uses a slide-out cart, many customers decide to checkout directly from there.
Stick to icons for payment methods you actually accept, showing PayPal when you don't support it erodes trust rather than building it.
Also, If you want to add FAQs in Product in your Wix Stores eCommerce site, Codeyard brings you the right solution to seamlessly display product-specific FAQs, improve customer confidence, and increase conversions.

Conclusion
Adding payment icons and trust badges to your Wix store takes less than 10 minutes and can meaningfully improve how much shoppers trust your checkout flow. With placements available on the product page, side cart, and checkout page, you can cover every step of the purchase journey.

Comments